This article will assist you in creating a basic Spring Boot project. You will add code to the project that will allow you to connect to a database using Spring JDBC. You will learn how to code all of the CRUD procedures.

You will learn
- How does Spring Boot Started JDBC work?
- How to connect a Spring Boot project to a database using Spring JDBC?
- How to write a simple repository class with all the CRUD methods?
- How to execute basic queries using Spring JDBC?
- How to create a project using Spring Boot, Spring JDBC, and H2?
- What are the basics of an in-memory database?
Project Code Structure
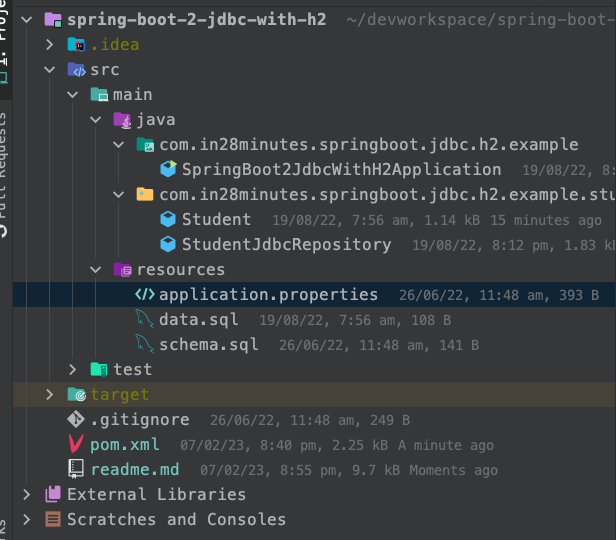
The framework of the project we will construct is seen in the screenshot below.

A few details
Student.java- The bean to store student details.StudentJdbcRepository.java- The H2 database contains all the methods to store and retrieve student details.schema.sql- Since we are using an in-memory database, we define the tables as part of our application code in this file.data.sql- We usedata.sqlto populate the initial student data.SpringBoot2JdbcWithH2Application.java- The main Spring Boot application class which is used to launch the application. We will extend theCommandLineRunnerinterface and implement thepublic void run(String... args)method to launch the spring JDBC code when the server launches.pom.xml- This contains all the dependencies needed to build this project. In addition to Developer Tools and H2, we will use Spring Boot Starter JDBC and Web.
Prerequisites:
- Maven 3.0+ is your build tool
- Your favorite IDE. We use Eclipse or IntelliJ.
- JDK 17
Maven Project Completion using Code Samples
Our Github repository has all the code examples. - https://github.com/in28minutes/spring-boot-examples/tree/master/spring-boot-2-jdbc-with-h2
A Little Theoretical
JDBC
- JDBC is an abbreviation for Java Database Connectivity.
- It made use of terms such as Statement, PreparedStatement, and ResultSet.
- The query used in the sample below is
Update todo set user=?, desc=?, target_date=?, is_done=? where id=? - The values required to run the query are entered into the query using various set methods on the PreparedStatement.
- The query’s results are added to the ResultSet. To convert the ResultSet into objects, we had to create code.
Update Todo
Connection connection = datasource.getConnection();

PreparedStatement st = connection.prepareStatement("Update todo set user=?, desc=?, target_date=?, is_done=? where id=?");

st.setString(1, todo.getUser());
st.setString(2, todo.getDesc());
st.setTimestamp(3, new Timestamp(todo.getTargetDate().getTime()));
st.setBoolean(4, todo.isDone());
st.setInt(5, todo.getId());

st.execute();

st.close();

connection.close();
Spring JDBC
- Spring JDBC is a layer that sits on top of JDBC.
- It made use of ideas such as JDBCTemplate.
- Although the following are simplified, it usually requires fewer lines than JDBC.
- The mapping of parameters to queries.
- liquidating yields beans
- Because all exceptions are transformed to RuntimeExceptions, no exception handling is required.
Creating the Project with Spring Initializr
Using Spring Initializr to create a REST service is a piece of cake. Our web framework will be Spring Web MVC.
Spring Initializr http://start.spring.io/ is great tool to bootstrap your Spring Boot projects.

As shown in the image above, following steps have to be done
- Launch Spring Initializr and choose the following
- Choose
com.in28minutes.springboot.jdbc.h2.exampleas Group - Choose
spring-boot-2-jdbc-with-h2as Artifact - Choose following dependencies
- Web
- JDBC
- H2
- DevTools
- Choose
- Click “Generate”
- Import the project into Eclipse. File -> Import -> Existing Maven Project.
- If you want to understand all the files that are part of this project, you can go here TODO.
Starter Projects in pom.xml
Below is the list of starter projects in pom.xml.
<dependency>
	<groupId>org.springframework.boot</groupId>
	<artifactId>spring-boot-starter-jdbc</artifactId>
</dependency>
<dependency>
	<groupId>org.springframework.boot</groupId>
	<artifactId>spring-boot-starter-web</artifactId>
</dependency>

<dependency>
	<groupId>org.springframework.boot</groupId>
	<artifactId>spring-boot-devtools</artifactId>
	<scope>runtime</scope>
</dependency>

<dependency>
	<groupId>com.h2database</groupId>
	<artifactId>h2</artifactId>
	<scope>runtime</scope>
</dependency>
<dependency>
	<groupId>org.springframework.boot</groupId>
	<artifactId>spring-boot-starter-test</artifactId>
	<scope>test</scope>
</dependency>
Set up the H2 in-memory database using the schema.
H2 will be used as the database.
To see the data, H2 provides a web interface called H2 Console. Allow the H2 console to be enabled in the ‘application.properties’ file.
/src/main/resources/application.properties
# Enabling H2 Console
spring.h2.console.enabled=true
#Turn Statistics on
spring.jpa.properties.hibernate.generate_statistics=true
logging.level.org.hibernate.stat=debug
# Show all queries
spring.jpa.show-sql=true
spring.jpa.properties.hibernate.format_sql=true
logging.level.org.hibernate.type=trace

spring.datasource.url=jdbc:h2:mem:testdb
spring.data.jpa.repositories.bootstrap-mode=default
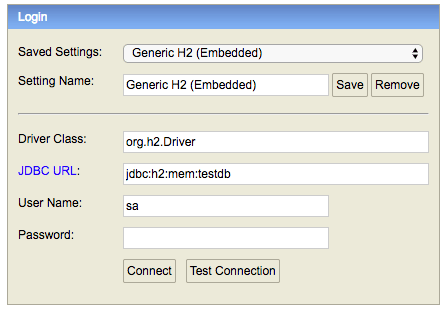
You may access H2 Console by reloading the application http://localhost:8080/h2-console

Tip - Make sure that you use
jdbc:h2:mem:testdbas JDBC URL.
When you provide the correct JDBC URL, you should see an empty schema when you click the ‘Connect’ button.

Build a schema using schema.sql and a data set with data.sql.
We’ll make a “student” table with a few simple columns. We may start a schema by generating a schema.sql file in the resources folder.
/src/main/resources/schema.sql
create table student
(
   id integer not null,
   name varchar(255) not null,
   passport_number varchar(255) not null,
   primary key(id)
);
Let’s additionally add some information to the student table.
/src/main/resources/data.sql
insert into student values(10001,'Ranga', 'E1234567');
insert into student values(10002,'Ravi', 'A1234568');
After you refresh the application, you should see the following messages in the log showing that the sql files have been picked up.
Executing SQL script from URL [file:/in28Minutes/git/spring-boot-examples/spring-boot-2-jdbc-with-h2/target/classes/schema.sql]
Executing SQL script from URL [file:/in28Minutes/git/spring-boot-examples/spring-boot-2-jdbc-with-h2/target/classes/data.sql]
When you access H2 Console (http://localhost:8080/h2-console), you’ll notice that the student table has been created and the data has been loaded.

Creating Student Bean
Let’s make a simple Student bean that has basic student information as well as getters, setters, and a function toString() function.
ppackage com.in28minutes.springboot.jdbc.h2.example.student;

public class Student {
    private Long id;
    private String name;
    private String passportNumber;

    public Student() {
        super();
    }

    public Student(Long id, String name, String passportNumber) {
        super();
        this.id = id;
        this.name = name;
        this.passportNumber = passportNumber;
    }

    public Student(String name, String passportNumber) {
        super();
        this.name = name;
        this.passportNumber = passportNumber;
    }

    public Long getId() {
        return id;
    }

    public void setId(Long id) {
        this.id = id;
    }

    public String getName() {
        return name;
    }

    public void setName(String name) {
        this.name = name;
    }

    public String getPassportNumber() {
        return passportNumber;
    }

    public void setPassportNumber(String passportNumber) {
        this.passportNumber = passportNumber;
    }

    @Override
    public String toString() {
        return String.format("Student [id=%s, name=%s, passportNumber=%s]", id, name, passportNumber);
    }

}
Build a repository way for reading student data.
We’d want to start by making a basic repository. A JDBCTemplate will be used to communicate with the database.
@Repository
public class StudentJdbcRepository {
	@Autowired
	JdbcTemplate jdbcTemplate;
Spring Boot Auto Configuration detects H2 on the classpath. It recognises that we wish to communicate with an in-memory database. It creates a datasource as well as a JDBCTemplate that connects to that datasource.
Create the findById method in StudentJDBCRepository to obtain a student by ID.
	public Student findById(long id) {
		return jdbcTemplate.queryForObject("select * from student where id=?", new BeanPropertyRowMapper<>(Student.class), id);
	}
Notes
JdbcTemplatehas a number of methods to execute queries. In this example, we are using thequeryForObjectmethod.new BeanPropertyRowMapper<Student>(Student.class)- We are using a BeanPropertyRowMapper to map the results from ResultSet to the Student bean.id- We are passing id as a parameter to the query
We’d want to use the findById function. To keep things simple, we’ll create the SpringBoot2JdbcWithH2Application class implement CommandLineRunner and include a run function that calls the repository’s findById method.
/src/main/java/com/in28minutes/springboot/jdbc/h2/example/SpringBoot2JdbcWithH2Application.java
@SpringBootApplication
public class SpringBoot2JdbcWithH2Application implements CommandLineRunner {

	private final Logger logger = LoggerFactory.getLogger(this.getClass());

	@Autowired
	StudentJdbcRepository repository;

	public static void main(String[] args) {
		SpringApplication.run(SpringBoot2JdbcWithH2Application.class, args);
	}

	@Override
	public void run(String... args) throws Exception {

		logger.info("Student id 10001 -> {}", repository.findById(10001L));
	}
}
Notes
@Autowired StudentJdbcRepository repository;- We will autowire the StudentJdbcRepository that we previously constructed.public void run(String... args) throws Exception {- Implement the commandLineRunner interface’s run function. When the application is launched, this method is called.logger.info("Student id 10001 -> {}", repository.findById(10001L))- Log all the information about student id 10001.
This will be shown in the log when the application reloads.
Student id 10001 -> Student [id=10001, name=Ranga, passportNumber=E1234567]
Congrats for successfully running the first Spring JDBC method! Spring Boot demonstrates how simple it is.
Let’s now add another method to get information about all of the students from the StudentJdbcRepository.
	static class StudentRowMapper implements RowMapper<Student> {
        @Override
        public Student mapRow(ResultSet rs, int rowNum) throws SQLException {
            Student student = new Student();
            student.setId(rs.getLong("id"));
            student.setName(rs.getString("name"));
            student.setPassportNumber(rs.getString("passport_number"));
            return student;
        }

    }

	public List<Student> findAll() {
		return jdbcTemplate.query("select * from student", new StudentRowMapper());
	}
Notes
class StudentRowMapper implements RowMapper<Student>- To map the result set to a student bean, we define a custom row mapper.jdbcTemplate.query("select * from student", new StudentRowMapper())- We utilise the ‘query’ method in JdbcTemplate to retrieve a list of students.
In the run method, we may include a call to the find all function.SpringBoot2JdbcWithH2Application.java
logger.info("All users 1 -> {}", repository.findAll());
After you restart the project, you should see the following output in the log.
All users 1 -> [Student [id=10001, name=Ranga, passportNumber=E1234567], Student [id=10002, name=Ravi, passportNumber=A1234568]]
Implementing Spring JDBC delete, insert, and update methods
The following code demonstrates the delete, insert, and update methods.
	public void deleteById(long id) {
        jdbcTemplate.update("delete from student where id=?", id);
    }

	public int insert(Student student) {
        return jdbcTemplate.update("insert into student (id, name, passport_number) " + "values(?,  ?, ?)",
                student.getId(), student.getName(), student.getPassportNumber());
    }

	public int update(Student student) {
        return jdbcTemplate.update("update student " + " set name = ?, passport_number = ? " + " where id = ?",
                student.getName(), student.getPassportNumber(), student.getId());
    }
Notes
- These procedures are pretty simple.
-All methods make use of the JdbcTemplate class’s
updatefunction to specify the appropriate query and parameters.
All of the aforementioned methods can be called in the run method of SpringBoot2JdbcWithH2Application.java
logger.info("Inserting -> {}", repository.insert(new Student(10010L, "John", "A1234657")));

logger.info("Update 10001 -> {}", repository.update(new Student(10001L, "Name-Updated", "New-Passport")));

repository.deleteById(10002L);

logger.info("All users 2 -> {}", repository.findAll());
After you restart the project, you should see the following output in the log.
Inserting -> 1
Update 10003 -> 1
All users -> [Student [id=10001, name=Name-Updated, passportNumber=New-Passport], Student [id=10010, name=John, passportNumber=A1234657]]
That’s fantastic! You’ve used Spring JDBC and Spring Boot to implement all of the CRUD functions.


