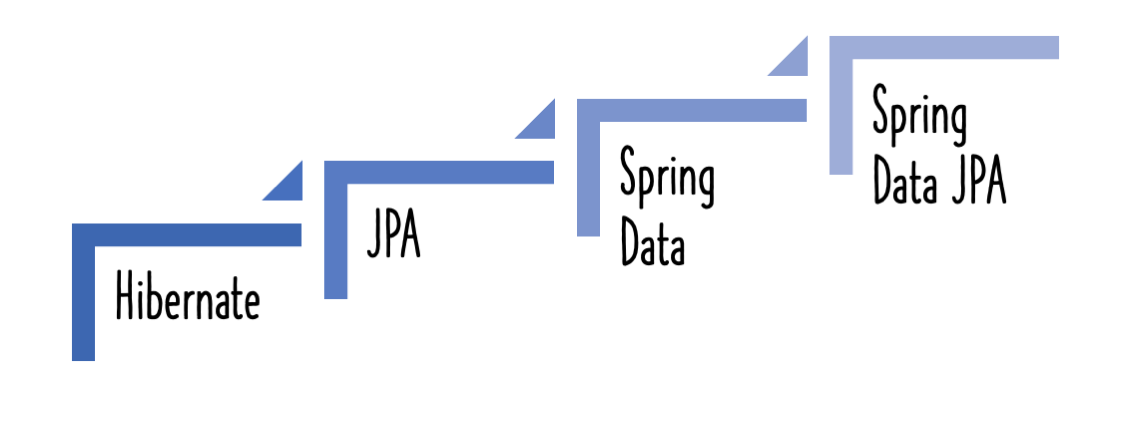
This post will show you how to establish a simple Spring Boot project and connect to a database using Hibernate/JPA. Spring Boot Starter JPA and the in-memory database H2 will be used.
You will learn
- Basics of JPA/Hibernate
- How to create a project using Spring Boot, Spring Boot Starter JPA and H2?
- How to use Spring Boot Starter JPA?
- How to connect a Spring Boot project to database using JPA/Hibernate?
- How to create a simple JPA Entity with a primary key?
- How to write a simple repository interface extending JpaRepository interface?
- What are the basics of an in memory database?
Spring Boot and Hibernate Course
Structure of the Project Code
The screenshot below depicts the framework of the project we will be creating.
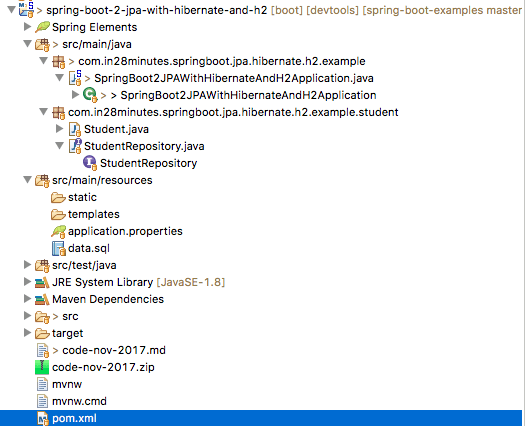
A few specifics:
Student.java- Entity bean to store student details.StudentRepository.java- Extends JpaRepository. Acts as a repository to update/retrieve Student entities.data.sql- We use data.sql to populate the initial student data.- SpringBoot2JPAWithHibernateAndH2Application.java - The main Spring Boot Application class which is used to launch up the application. We will extend
CommandLineRunnerinterface and implementpublic void run(String... args)method to launch the spring jpa repository methods when the server launches up. pom.xml- Contains all the dependencies needed to build this project. We will use Spring Boot Starter JPA and Web other than Developer Tools and H2 as in memory database.
Tools you will need
- Maven 3.0+ is your build tool
- Your favorite IDE. We use Eclipse or IntelliJ.
- JDK 17+
Maven Project Completion using Code Samples
Our Github repository has all the code examples - https://github.com/in28minutes/spring-boot-examples/tree/master/spring-boot-2-jpa-with-hibernate-and-h2
How Does JPA/Hibernate Function?
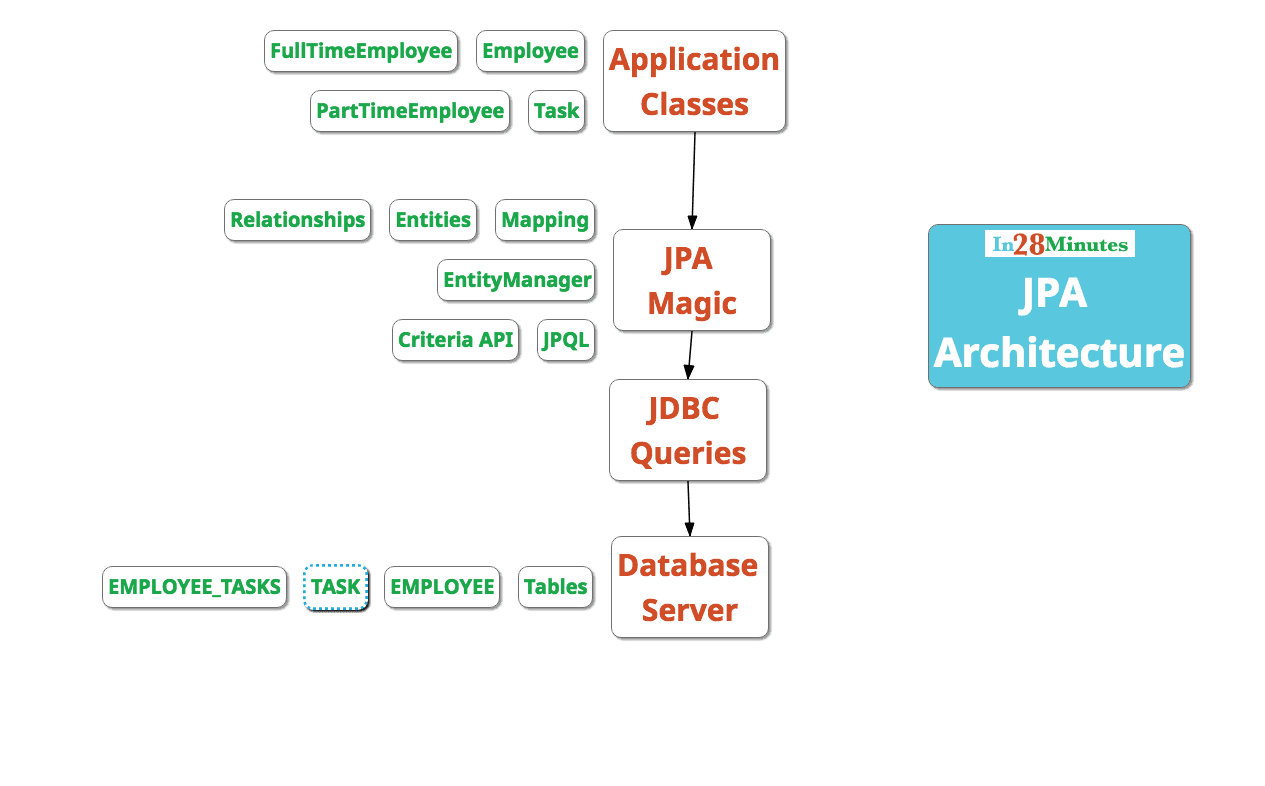
Tables/Relations are used to design databases. OOPS is used to develop Java objects. We’d want to save data from objects to tables and vice versa.
Previous techniques required the creation of SQL Queries. Popular techniques included JDBC, Spring JDBC, and myBatis.
JPA, on the other hand, arose as a result of a different conceptual process.
What about mapping the objects to tables/relationships directly?
ORM - Object Relational Mapping - is another name for this mapping. Prior to JPA, these frameworks were more generally referred to as ORM. It is one of the reasons Hibernate is referred to as an ORM framework.
Key JPA Concepts

JPA allows to map application classes to tables in database.
Entity Manager- Entity manager may manage your entities after the mappings are defined. Entity Manager manages all database interactions.JPQL (Java Persistence Query Language)- Offers methods for writing queries to do entity searches. It is critical to recognise that these are not SQL queries. JPQL queries are already aware of the mappings that exist between entities. More criteria can be added as needed.Criteria APIspecifies a Java-based API for doing database searches.
Choosing between JPA and Hibernate
One of the most popular ORM frameworks is Hibernate.
The specification is defined by JPA. It is a programming interface.
- How do you define entities?
- How do you map attributes?
- How do you map relationships between entities?
- Who manages the entities?
Hibernate is a well-known JPA implementation.
- Hibernate recognises the mappings we create between objects and tables. It guarantees that data is stored and retrieved from the database in accordance with the mappings.
- Hibernate extends JPA with extra functionality. But, relying on them would bind you to Hibernate. You cannot switch to another JPA implementation, such as Toplink.
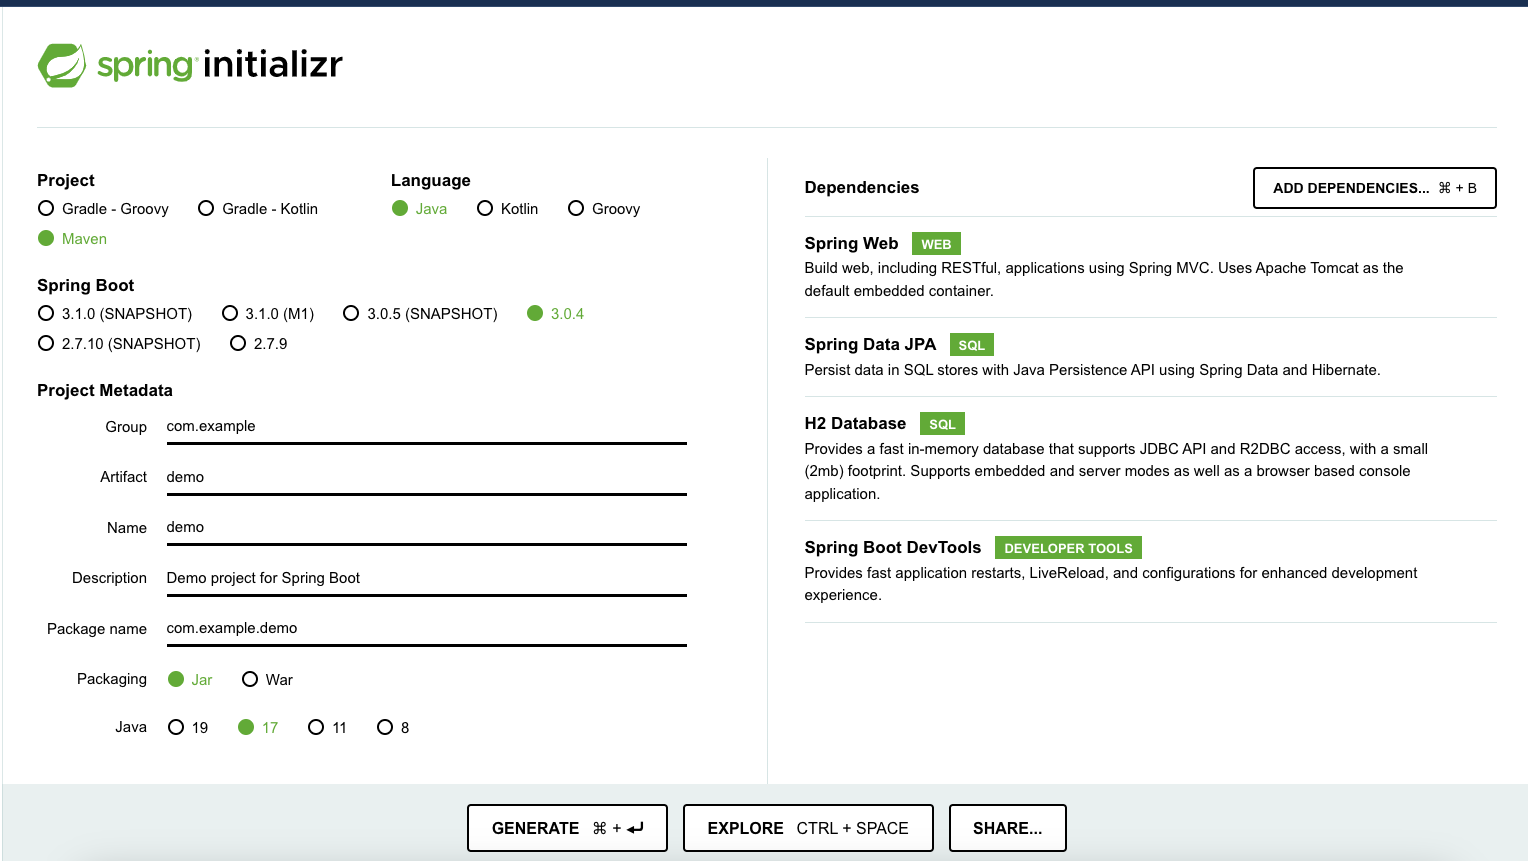
Spring Initializr is used to create a project.
Spring Initializr http://start.spring.io/ is great tool to bootstrap your Spring Boot projects.

As shown in the image above, following steps have to be done
- Launch Spring Initializr and choose the following
- Choose
com.in28minutes.springboot.rest.exampleas Group - Choose
spring-boot-2-jpa-with-hibernate-and-h2as Artifact - Choose following dependencies
- Web
- JPA
- H2
- DevTools
- Choose
- Click Generate Project.
- Import the project into Eclipse. File -> Import -> Existing Maven Project.
Starter Projects in pom.xml
Below is the list of starter projects in pom.xml.
		<dependency>
			<groupId>org.springframework.boot</groupId>
			<artifactId>spring-boot-starter-jpa</artifactId>
		</dependency>
		<dependency>
			<groupId>org.springframework.boot</groupId>
			<artifactId>spring-boot-starter-web</artifactId>
		</dependency>

		<dependency>
			<groupId>org.springframework.boot</groupId>
			<artifactId>spring-boot-devtools</artifactId>
			<scope>runtime</scope>
		</dependency>

		<dependency>
			<groupId>com.h2database</groupId>
			<artifactId>h2</artifactId>
			<scope>runtime</scope>
		</dependency>
		<dependency>
			<groupId>org.springframework.boot</groupId>
			<artifactId>spring-boot-starter-test</artifactId>
			<scope>test</scope>
		</dependency>
Understanding Spring Boot Starter JPA
Below picture highlights some of the dependencies that are part of the imported JPA project.

Key Question : How did all these dependencies come in?
Spring-boot-starter-jpa defines all of these dependencies. We obtain the following functionalities from a wide range of dependencies as soon as we include Spring Boot Starter JPA in our project (pom.xml).
- AOP
- Transaction Management
- JPA API
- JPA Implementation - Default Hibernate
- JDBC
Extract below shows some code from pom.xml of spring-boot-starter-jpa.
<dependency>
  <groupId>org.springframework.boot</groupId>
  <artifactId>spring-boot-starter-aop</artifactId>
  <version>3.0.4</version>
  <scope>compile</scope>
</dependency>
<dependency>
  <groupId>org.springframework.boot</groupId>
  <artifactId>spring-boot-starter-jdbc</artifactId>
  <version>3.0.4</version>
  <scope>compile</scope>
</dependency>
<dependency>
  <groupId>org.springframework.boot</groupId>
  <artifactId>spring-boot-starter-jdbc</artifactId>
  <version>3.0.4</version>
   <scope>compile</scope>
</dependency>
<dependency>
  <groupId>org.hibernate.orm</groupId>
  <artifactId>hibernate-core</artifactId>
  <version>6.1.7.Final</version>
  <scope>compile</scope>
</dependency>
<dependency>
   <groupId>org.springframework.data</groupId>
   <artifactId>spring-data-jpa</artifactId>
   <version>3.0.3</version>
   <scope>compile</scope>
</dependency>
<dependency>
  <groupId>org.springframework</groupId>
  <artifactId>spring-aspects</artifactId>
  <version>6.0.6</version>
  <scope>compile</scope>
</dependency>
Enable H2 Console
We will use H2 as the database.
H2 provides a web interface called H2 Console to see the data. Let’s enable h2 console in the application.properties.
/src/main/resources/application.properties
# Enabling H2 Console
spring.h2.console.enabled=true
spring.data.jpa.repositories.bootstrap-mode=default
spring.jpa.defer-datasource-initialization=true
When you reload the application, you can launch up H2 Console at http://localhost:8080/h2-console.
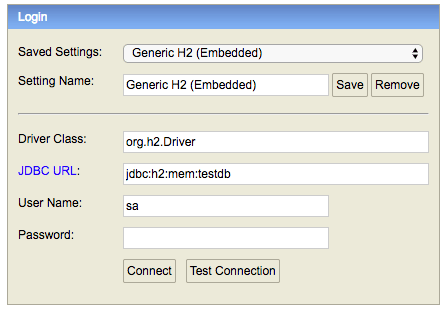
Tip - Make sure that you use
jdbc:h2:mem:testdbas JDBC URL.
When you use the right JDBC URL given above, you should see an empty schema when you click Connect button.

Make Your Very First JPA Entity
The first thing to do is to build a JPA Entity. Let’s start with a basic Student Entity with a primary key id.
package com.in28minutes.springboot.jpa.hibernate.h2.example.student;

// Changed from javax to jakarta
import jakarta.persistence.Entity;
import jakarta.persistence.GeneratedValue;
import jakarta.persistence.Id;

@Entity
public class Student {
	@Id
	@GeneratedValue
	private Long id;
	private String name;
	private String passportNumber;

	public Student() {
		super();
	}

	public Student(Long id, String name, String passportNumber) {
		super();
		this.id = id;
		this.name = name;
		this.passportNumber = passportNumber;
	}

	public Student(String name, String passportNumber) {
		super();
		this.name = name;
		this.passportNumber = passportNumber;
	}

	public Long getId() {
		return id;
	}

	public void setId(Long id) {
		this.id = id;
	}

	public String getName() {
		return name;
	}

	public void setName(String name) {
		this.name = name;
	}

	public String getPassportNumber() {
		return passportNumber;
	}

	public void setPassportNumber(String passportNumber) {
		this.passportNumber = passportNumber;
	}

	@Override
	public String toString() {
		return String.format("Student [id=%s, name=%s, passportNumber=%s]", id, name, passportNumber);
	}

}
Important things to note:
@Entity: Specifies that the class is an entity. This annotation is applied to the entity class.@Id: Specifies the primary key of an entity.@GeneratedValue: Provides for the specification of generation strategies for the values of primary keys.public Student(): Default constructor to make JPA Happy
You may launch H2 console when the programme reloads. http://localhost:8080/h2-console.
On H2 Console, you will notice that a new table called student is generated.
How did the Student table get created?
Its because of Spring Boot Auto Configuration. We will talk about this a little later.
Let’s now add some information to the student table.
/src/main/resources/data.sql
insert into student values(10001,'Ranga', 'E1234567');

insert into student values(10002,'Ravi', 'A1234568');
After you refresh the application, you should see the following messages in the log showing that the sql files have been picked up.
Executing SQL script from URL [file:/in28Minutes/git/spring-boot-examples/spring-boot-2-jdbc-with-h2/target/classes/data.sql]
When you connect to H2 Console (http://localhost:8080/h2-console) after reloading the app, you will notice that the student table has been created and the data has been loaded.

Build a Repository class to read Student data.
/src/main/java/com/in28minutes/springboot/jpa/hibernate/h2/example/student/StudentRepository.java
We extend JpaRepository to create a simple interface called StudentRepository.
package com.in28minutes.springboot.jpa.hibernate.h2.example.student;

import org.springframework.data.jpa.repository.JpaRepository;
import org.springframework.stereotype.Repository;

@Repository
public interface StudentRepository extends JpaRepository<Student, Long>{

}
Notes
- We’ll go over all of the methods in the JpaRepository later.
public interface StudentRepository extends JpaRepository<Student, Long>- JpaRepository is being extended with two generics: Student and Long. The entity being handled is Student, and the main key of Student is Long.
JpaRepository
JpaRepository (Defined in Spring Data JPA) is the JPA specific Repository interface.
public interface JpaRepository<T, ID extends Serializable>
		extends PagingAndSortingRepository<T, ID>, QueryByExampleExecutor<T> {
JpaRepository extends PagingAndSortingRepository which in turn extends CrudRepository interface. So, JpaRepository inherits all the methods from the two interfaces shown below.
PagingAndSortingRepository
public abstract interface PagingAndSortingRepository extends CrudRepository {

  public abstract Iterable findAll(Sort arg0);

  public abstract Page findAll(Pageable arg0);

}
CrudRepository
public interface CrudRepository<T, ID extends Serializable>
    extends Repository<T, ID> {

    <S extends T> S save(S entity);

    T findOne(ID primaryKey);

    Iterable<T> findAll();

    Long count();

    void delete(T entity);

    boolean exists(ID primaryKey);

    // … more functionality omitted.
}
Enable Debug Logging for Hibernate and Queries
Before we go any further, let’s enable logging for all queries generated by Hibernate. We also enable statistics and format generated sql statements.
/src/main/resources/application.properties
#Turn Statistics on
spring.jpa.properties.hibernate.generate_statistics=true
logging.level.org.hibernate.stat=debug
# Show all queries
spring.jpa.show-sql=true
spring.datasource.url=jdbc:h2:mem:testdb
spring.data.jpa.repositories.bootstrap-mode=default
spring.jpa.properties.hibernate.format_sql=true
logging.level.org.hibernate.type=trace
spring.datasource.url=jdbc:h2:mem:testdb
spring.data.jpa.repositories.bootstrap-mode=default
spring.jpa.defer-datasource-initialization=true
Some of the log that is generated (later when we execute queries) when we turn statistics on is shown below.
Session Level Metrics
023-03-22T13:37:31.818+05:30  INFO 18636 --- [  restartedMain] i.StatisticalLoggingSessionEventListener : Session Metrics {
    25207 nanoseconds spent acquiring 1 JDBC connections;
    0 nanoseconds spent releasing 0 JDBC connections;
    1381963 nanoseconds spent preparing 1 JDBC statements;
    351842 nanoseconds spent executing 1 JDBC statements;
    0 nanoseconds spent executing 0 JDBC batches;
    0 nanoseconds spent performing 0 L2C puts;
    0 nanoseconds spent performing 0 L2C hits;
    0 nanoseconds spent performing 0 L2C misses;
    0 nanoseconds spent executing 0 flushes (flushing a total of 0 entities and 0 collections);
    0 nanoseconds spent executing 0 partial-flushes (flushing a total of 0 entities and 0 collections)
}
Queries and Parameters
2023-03-22T13:37:31.819+05:30  INFO 18636 --- [  restartedMain] ibernateAndH2Application$$SpringCGLIB$$0 : Student id 10001 -> Optional[Student [id=10001, name=Ranga, passportNumber=E1234567]]
Hibernate:
    select
        next value for student_seq
Hibernate:
    insert
    into
        student
        (name, passport_number, id)
    values
        (?, ?, ?)
Exploring JpaRepository methods
The code below extends the SpringBoot2JPAWithHibernateAndH2Application class to perform some StudentRepository methods.
@SpringBootApplication
public class SpringBoot2JPAWithHibernateAndH2Application implements CommandLineRunner {

	private final Logger logger = LoggerFactory.getLogger(this.getClass());

	@Autowired
	StudentRepository repository;

	public static void main(String[] args) {
		SpringApplication.run(SpringBoot2JPAWithHibernateAndH2Application.class, args);
	}

	@Override
	public void run(String... args) throws Exception {
		//Code to run at application startup
	}
}
Spring Boot Auto Configuration sees H2 in the classpath. It understands that we would want to talk to an in memory database. It auto configures a datasource and also a JdbcTemplate connecting to that datasource.
Important Things To Note
SpringBoot2JPAWithHibernateAndH2Application implements CommandLineRunner- Implementing CommandLineRunner helps to execute the repository methods at start of the application.public void run(String... args) throws Exception {- Implement the run method defined in the CommandLineRunner interface. This method is executed as soon as the application is launched up.
Let’s extend the run method to execute a few methods on the student repository.
@Override
public void run(String... args) throws Exception {

	logger.info("Student id 10001 -> {}", repository.findById(10001L));

	logger.info("All users 1 -> {}", repository.findAll());

	//Insert
	logger.info("Inserting -> {}", repository.save(new Student("John", "A1234657")));

	//Update
	logger.info("Update 10001 -> {}", repository.save(new Student(10001L, "Name-Updated", "New-Passport")));

	repository.deleteById(10002L);

	logger.info("All users 2 -> {}", repository.findAll());
}
Important points to Note:
- findById, findAll, deleteById methods are self explanatory.
- `save’ method is used for both insertion and updates. If the entity is already present in the database, it is updated. Else, it is inserted.
Output from above statements when the code is run is shown below:
Student id 10001 -> Optional[Student [id=10001, name=Ranga, passportNumber=E1234567]]
All users 1 -> [Student [id=10001, name=Ranga, passportNumber=E1234567], Student [id=10002, name=Ravi, passportNumber=A1234568]]
Inserting -> Student [id=1, name=John, passportNumber=A1234657]
Update 10001 -> Student [id=10001, name=Name-Updated, passportNumber=New-Passport]
All users 2 -> [Student [id=1, name=John, passportNumber=A1234657], Student [id=10001, name=Name-Updated, passportNumber=New-Passport]]
Few more advanced JPA/Hibernate ORM Mappings
Lets look at a few more examples to understand how JPA can be used to map objects to tables.
Example 1 - Relationships @ManyToMany
Relationships between objects are expressed in a different way compared to relationship between tables.
Each Employee can have multiple Tasks. Each Task can be shared by multiple Employees. There is a Many to Many relationship between them. We use @ManyToMany annotation to establish the relationship.
public class Employee {

     //Some other code

	@ManyToMany
	private List<Task> tasks;
}

public class Task {

     //Some other code

	@ManyToMany(mappedBy = "tasks")
	private List<Employee> employees;
}
CREATE TABLE employee
  (
     id            BIGINT NOT NULL,
     OTHER_COLUMNS
  )


  CREATE TABLE employee_tasks
  (
     employees_id BIGINT NOT NULL,
     tasks_id     INTEGER NOT NULL
  )

  CREATE TABLE task
  (
     id          INTEGER GENERATED BY DEFAULT AS IDENTITY,
     OTHER_COLUMNS
  )
Example 2 - Inheritance Startegies - InheritanceType.SINGLE_TABLE
Several classes are sometimes mapped to a single table, and vice versa. In these cases, we devise an inheritance approach. In this example, we employ an InheritanceType technique. SINGLE TABLE.
Objects
@Entity
@Inheritance(strategy = InheritanceType.SINGLE_TABLE)
@DiscriminatorColumn(name = "EMPLOYEE_TYPE")
public  class Employee {
    //Other Employee Attributes
}

public class FullTimeEmployee extends Employee {
	protected Integer salary;
}

public class PartTimeEmployee extends Employee {
	protected Float hourlyWage;
}
Tables
CREATE TABLE employee
  (
     employee_type VARCHAR(31) NOT NULL,
     id            BIGINT NOT NULL,
     city          VARCHAR(255),
     state         VARCHAR(255),
     street        VARCHAR(255),
     zip           VARCHAR(255),

     hourly_wage   FLOAT,  --PartTimeEmployee

     salary        INTEGER, --FullTimeEmployee

     PRIMARY KEY (id)
  )
Example of Full Code
Github repository has all the code examples - https://github.com/in28minutes/spring-boot-examples/tree/master/spring-boot-2-jpa-with-hibernate-and-h2
